
· 14 min read
Examples of FFmpeg's non-local means noise reduction filter
Four working FFmpeg nlmeans command lines for grainy video — each parameter explained, plus a tuning that runs 21× faster than the defaults.
nlmeans is one of FFmpeg’s noise-reduction filters — for cleaning grain, sensor noise, and compression artefacts out of video. Reach for it when you have visibly grainy footage and the simpler hqdn3d filter isn’t pulling enough of the noise out. Below are four working command lines you can paste against a noisy sample right now, a plain-language map of the five parameters that control the filter, and a tuning that runs 21× faster than the defaults.
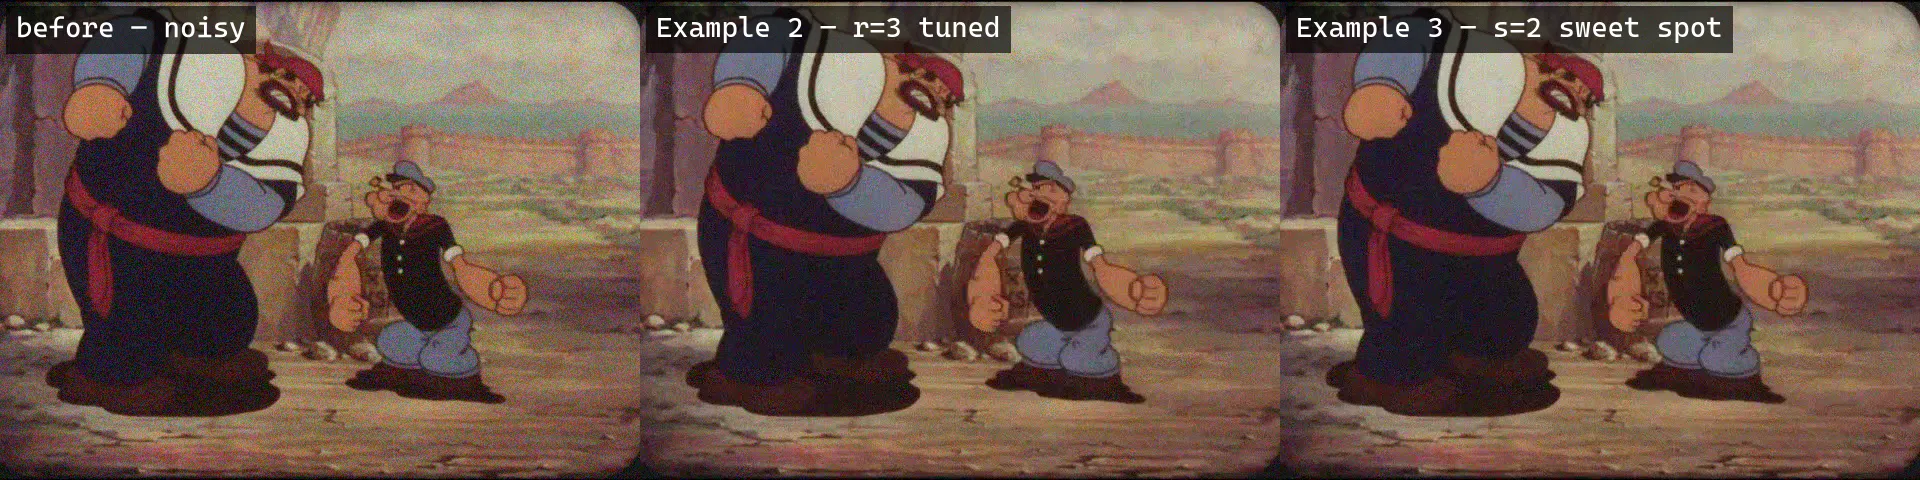
What the filter does
For every pixel, nlmeans looks at a small surrounding patch, hunts an area around the pixel for other patches that look like it, and blends in the matches. Patches that look similar get more weight; patches that don’t get less. The official description is succinct (filters.texi line 18655):
Each pixel is adjusted by looking for other pixels with similar contexts. This context similarity is defined by comparing their surrounding patches of size p×p. Patches are searched in an area of r×r around the pixel.
The name “non-local means” describes this in two parts. The means part: matching patches are averaged together (the mean of similar pixels replaces the noisy original). The non-local part: the matches can come from anywhere in a search window, not just the pixel’s immediate neighbors — which is what older filters like hqdn3d are limited to. Pulling matches from farther away is what makes nlmeans better at preserving real detail while removing random noise.
The five parameters
Pulled from ffmpeg -h filter=nlmeans and the official docs at ffmpeg.org/ffmpeg-filters.html#nlmeans-1:
| Option | Default | Range | What it controls |
|---|---|---|---|
s | 1.0 | 1.0 – 30.0 | denoising strength |
p | 7 | 0 – 99, odd | patch size in pixels |
pc | 0 (auto = p) | 0 – 99, odd | patch size for chroma planes |
r | 15 | 0 – 99, odd | research-window size |
rc | 0 (auto = r) | 0 – 99, odd | research-window for chroma planes |
The cost-per-pixel scales roughly with p² × r². r is the dominant lever — squaring it dominates the numbers you’ll see below.
The docs say p, pc, r, rc “must be odd” but in practice the filter accepts even values silently and treats them as the nearest odd — we tested p=8 and it produced byte-identical output to p=7. You won’t break anything by setting an even value; you also won’t get an error if you were expecting one.
Four working command lines
All examples use popeye_meets_sinbad_noisy_image.mp4 (5 seconds) — swap in your own noisy file when you have one.
1. The defaults, for a baseline
ffmpeg -i popeye_meets_sinbad_noisy_image.mp4 \
  -vf nlmeans -c:a copy denoised.mp4
This is s=1, p=7, r=15 — what the docs hand you and what most blog posts repeat. On the 5-second 640×480 popeye sample above, this command took 13 seconds of CPU to process 5 seconds of video and dropped the bitrate from 19 Mb/s down to 6.1 Mb/s. Don’t ship this; it’s the calibration baseline.
2. The r=3 speedup tuning
ffmpeg -i popeye_meets_sinbad_noisy_image.mp4 \
  -vf nlmeans=1.0:7:5:3:3 -c:a copy denoised.mp4
That positional form is s=1.0 : p=7 : pc=5 : r=3 : rc=3. The critical change is r=3 instead of the default r=15. A VideoHelp thread (thread 398880) reports “huge” speedup with “close to zero” fine-detail loss. Our run confirms it on the popeye sample: the same command finishes in 0.62 seconds of CPU instead of 13 — a ~21× speedup on the same source, and the output bitrate came in identical to the defaults (6143 kb/s in both runs), so the speed gain costs nothing in compression.
The math is (15/3)² = 25. The filter cost is dominated by the research-window area; cut its side length by 5×, the work drops by roughly 25×. Our measured 21× is the theoretical 25× minus a bit of constant per-frame overhead.
The same thread suggests useful strength ranges per resolution: s between 1.0 and 1.8 for 720p, 1.0 and 4.0 for 1080p. Treat those as starting points; the right s is whatever cleans your noise without blurring detail you wanted to keep.
3. The sweet spot when defaults aren’t strong enough
ffmpeg -i popeye_meets_sinbad_noisy_image.mp4 \
  -vf nlmeans=s=2.0:p=5:r=9 -c:a copy denoised.mp4
s=2, p=5, r=9 took 4.4 seconds of CPU on the popeye sample (a touch faster than playback) and was the only single-pass recipe in our tests that produced measurably smaller output than the defaults — 5664 vs 6143 kb/s, about 8% smaller at the same CRF. Stronger denoising per pixel (s=2), but a tighter search window (r=9 instead of 15) keeps the per-pixel cost low. That trade is what makes the recipe both stronger and faster than the defaults.
4. The highest-quality option (and the slowest)
ffmpeg -i popeye_meets_sinbad_noisy_image.mp4 \
  -vf "split[a][b],[a]nlmeans=s=3:r=7:p=3[a],[b][a]bm3d=sigma=3:block=8:bstep=2:group=16:estim=final:ref=1" \
  -c:a copy denoised.mp4
bm3d uses a stronger denoising algorithm than nlmeans, but the way it works — finding similar blocks of pixels and averaging them — depends on being able to recognize which blocks should match. On a noisy input that recognition is itself noisy, so the matches are unreliable and the result suffers. The fix is to pre-clean a reference copy first: split duplicates the input into two streams [a] and [b]; nlmeans denoises stream [a] to make a reference; bm3d then denoises the still-noisy [b] while using the cleaned [a] as its block-matching reference (the ref=1 flag tells it to expect that second input). End result is bm3d’s output, higher quality than either filter alone.
The canonical recipe is in the official docs (ffmpeg.org/ffmpeg-filters.html#bm3d) with one gotcha — the shipped example (doc/filters.texi line 9227) uses block=4, but current bm3d requires block in [8, 64]; paste it verbatim and you get Value 4.000000 for parameter 'block' out of range [8 - 64]. The command above uses block=8 (the minimum legal value), which works.
On the popeye sample the pipeline cut the output bitrate by ~35% versus single-pass nlmeans (4.0 Mb/s vs 6.1 Mb/s at the same CRF) — the higher-quality result compresses better at the same CRF — but it took over a minute of CPU for 5 seconds of video. Overnight-batch territory, not interactive.
Benchmark results
All six commands above, run against the same popeye_meets_sinbad_noisy_image.mp4 source (5 seconds of 640×480 video at 19 Mb/s), encoded with -c:v libx264 -crf 23 -preset veryfast. Compare the Wall-clock column to the 5-second source length to see whether a recipe runs faster or slower than playback:
| Recipe | Wall-clock | Speedup | Output kb/s |
|---|---|---|---|
nlmeans (defaults) | 13.2s | 1× | 6143 |
nlmeans=1.0:7:5:3:3 | 0.62s | 21× | 6143 |
nlmeans=s=2.0:p=5:r=9 | 4.35s | 3× | 5664 |
nlmeans=s=3.0:p=15:r=31 | 68.6s | 0.2× | 6143 |
| bm3d+nlmeans two-stage | 65.5s | 0.2× | 3969 |
hqdn3d | 0.33s | 40× | 5628 |
nlmeans vs hqdn3d, briefly
hqdn3d is FFmpeg’s older, faster denoiser. On the popeye sample it finished in 0.33 seconds — almost twice as fast as the tuned nlmeans recipe — and produced output marginally smaller at the same CRF (5628 vs 6143 kb/s). For everyday cleanup of moderately noisy footage, -vf hqdn3d is the better default. Reach for nlmeans when hqdn3d isn’t pulling enough out — typically low-resolution sources, heavy film grain, or VHS captures.
bm3d (with nlmeans as a prefilter, as in Example 4) is the heaviest-quality option. atadenoise is a different kind of filter — purely temporal, averaging each pixel against the same pixel in adjacent frames, so it assumes a fairly stable shot. For most users the order of escalation is hqdn3d → nlmeans → bm3d-with-nlmeans-prefilter.
GPU variants
The CPU nlmeans filter advertises slice threading supported in ffmpeg -h filter=nlmeans, but in practice the parallelism is weak — defaults still took longer than the video’s own playback length with most cores idle. FFmpeg ships two GPU variants for when you need more throughput: nlmeans_opencl and nlmeans_vulkan. Both require a build compiled with the right backend.
Which builds have it
Check what your build has first:
ffmpeg -filters | grep nlmeansIf only nlmeans shows up, the binary was built without the opencl or vulkan plugins. ffmpeg -version shows every --enable-X flag in its configuration: line:
configuration: --enable-gpl ... --enable-opencl --enable-vulkan ...--enable-opencl brings the *_opencl filter family; --enable-vulkan brings *_vulkan. Across the build providers ffmpeg.download surfaces:
If you’re on Windows and have been using the default Gyan essentials build, that’s the one without GPU support; grab the Gyan “full” build or BtbN’s static build instead.
Running the GPU variants
The CPU filter is a drop-in -vf nlmeans. The GPU variants need three extra pieces: a hardware device initialised at startup (-init_hw_device), a step to copy the frame onto the GPU before the filter runs (hwupload), and a step to copy it back to system memory afterwards (hwdownload). The full chain looks like this:
ffmpeg -init_hw_device opencl=ocl -filter_hw_device ocl \
  -i popeye_meets_sinbad_noisy_image.mp4 \
  -vf "format=yuv420p,hwupload,nlmeans_opencl,hwdownload,format=yuv420p" \
  -c:v libx264 -crf 23 -c:a copy denoised.mp4
Two gotchas worth knowing before you paste.
Multiple OpenCL devices. Machines with both an integrated and a discrete GPU exposing OpenCL (most laptops with NVIDIA + Intel, or AMD + AMD) fail at the -init_hw_device step:
[OpenCL @ ...] More than one matching device found.
Device creation failed: -19.
Pick a platform explicitly with opencl=ocl:0.0 (first platform, first device) or opencl=ocl:1.0 (second platform). The discrete GPU is usually the higher-numbered one.
The “gray output” trap. The OpenCL filter outputs only the luma plane by default, so a naive hwupload, nlmeans_opencl, hwdownload chain fails at the hwdownload step — it doesn’t know what colour layout to copy back to system memory:
[hwdownload @ ...] Invalid output format gray for hwframe download.
[Parsed_hwdownload_2 @ ...] Failed to configure output pad on Parsed_hwdownload_2
End the chain with an explicit format=yuv420p (or whichever full-colour format you want), as in the example above. That tells hwdownload to copy back full Y+U+V, not just the gray luma plane.
The Vulkan filter follows the same shape:
ffmpeg -init_hw_device vulkan=vk -filter_hw_device vk \
  -i popeye_meets_sinbad_noisy_image.mp4 \
  -vf "format=yuv420p,hwupload,nlmeans_vulkan,hwdownload,format=yuv420p" \
  -c:v libx264 -crf 23 -c:a copy denoised.mp4
vulkan=vk instead of opencl=ocl, nlmeans_vulkan instead of nlmeans_opencl, no multi-device gotcha to disambiguate. The Vulkan filter’s option set is also broader than the CPU/OpenCL variants (docs): s accepts 0.0–100.0 instead of 1.0–30.0, per-plane strength via s0..s3 (e.g. s0=2:s1=0:s2=0 denoises luma only and leaves chroma untouched), a t parallelism knob, and alpha-channel support.
What we measured
Same popeye source, same encoder settings, BtbN’s n8.1.1 Windows build, on a laptop with an integrated Intel GPU and a discrete NVIDIA GPU, both exposing OpenCL:
| Variant | Wall-clock | Speedup vs CPU | Output kb/s |
|---|---|---|---|
CPU nlmeans (baseline, BtbN binary) | 14.0s | 1× | 6035 |
nlmeans_opencl on integrated Intel GPU | 12.5s | 1.1× | 5951 |
nlmeans_opencl on discrete NVIDIA GPU | 4.7s | 3× | 5949 |
nlmeans_vulkan (auto-picked device) | 11.1s | 1.3× | 6768 |
Two takeaways:
-
Discrete GPU OpenCL is the only variant worth the effort. It’s the only one that crosses the realtime threshold — 4.7 seconds of wall-clock for 5 seconds of video. The integrated GPU barely helps; an integrated GPU shares its memory bandwidth with the CPU, so the cost of uploading the frame to the GPU and downloading it back eats most of the speed win. If you have a discrete GPU and your build has OpenCL, that’s the path. If you don’t, the CPU
r=3tuning above is more useful than reaching for the integrated GPU. -
Vulkan’s “same defaults” aren’t really the same. Its output bitrate came in higher than the CPU baseline (6768 vs 6035 kb/s) at the same nominal
s=1, p=7, r=15, meaning it actually denoised less aggressively on this source. The Vulkan variant has a different parameter shape (per-planes0..s3instead of CPU’s singlescovering luma and chroma identically), and the defaults don’t map one-to-one. So Vulkan is faster on wall-clock but not directly comparable to the CPU at “the same settings” — you’d need to tunes0..s3to match the CPU’s denoise level before comparing speeds fairly.
One machine, one GPU pair. The bet I’d defend: a discrete GPU with OpenCL beats the CPU filter on most modern hardware. Everything else is hardware- and version-dependent — run the commands above on your own machine to find out.
Common error: “Result too large”
If you pass an out-of-range value, the error message is misleading:
[Parsed_nlmeans_0 @ ...] Value 0.500000 for parameter 's' out of range [1 - 30]
Error applying option 's' to filter 'nlmeans': Result too large
“Result too large” looks like an I/O error but it’s the ERANGE errno from the parameter validator. Read the line above it — that’s where the actual cause is.
Picking a recipe
For most reach-for-nlmeans cases, Example 2 (nlmeans=1.0:7:5:3:3) is the right starting point — same defaults effect, 21× faster. Example 3 (s=2:p=5:r=9) when the defaults aren’t strong enough. Example 4 (two-stage with bm3d) when you have CPU budget and the source really needs it. Skip Example 1 unless you’re calibrating against something.
One trap to avoid: cranking the parameters past the noise level you actually have. We ran nlmeans=s=3:p=15:r=31 (the maximum-ish recipe) against the same popeye source as the defaults; it took 5× longer (69 seconds for 5 seconds of video, vs 13 for defaults) and produced exactly the same output bitrate. Tune to the noise you have, not to the maximum the docs allow.
Before going further, make sure the FFmpeg you’re running actually has the filter. It’s shipped with FFmpeg since September 2016 (added by Clément Bœsch); older builds will tell you No such filter: 'nlmeans', but a current shared LGPL or GPL build has it baked in.